Monday, 28 March 2016

Quick and Easy 1/72 Ancient Chinese Han Dynasty Buildings

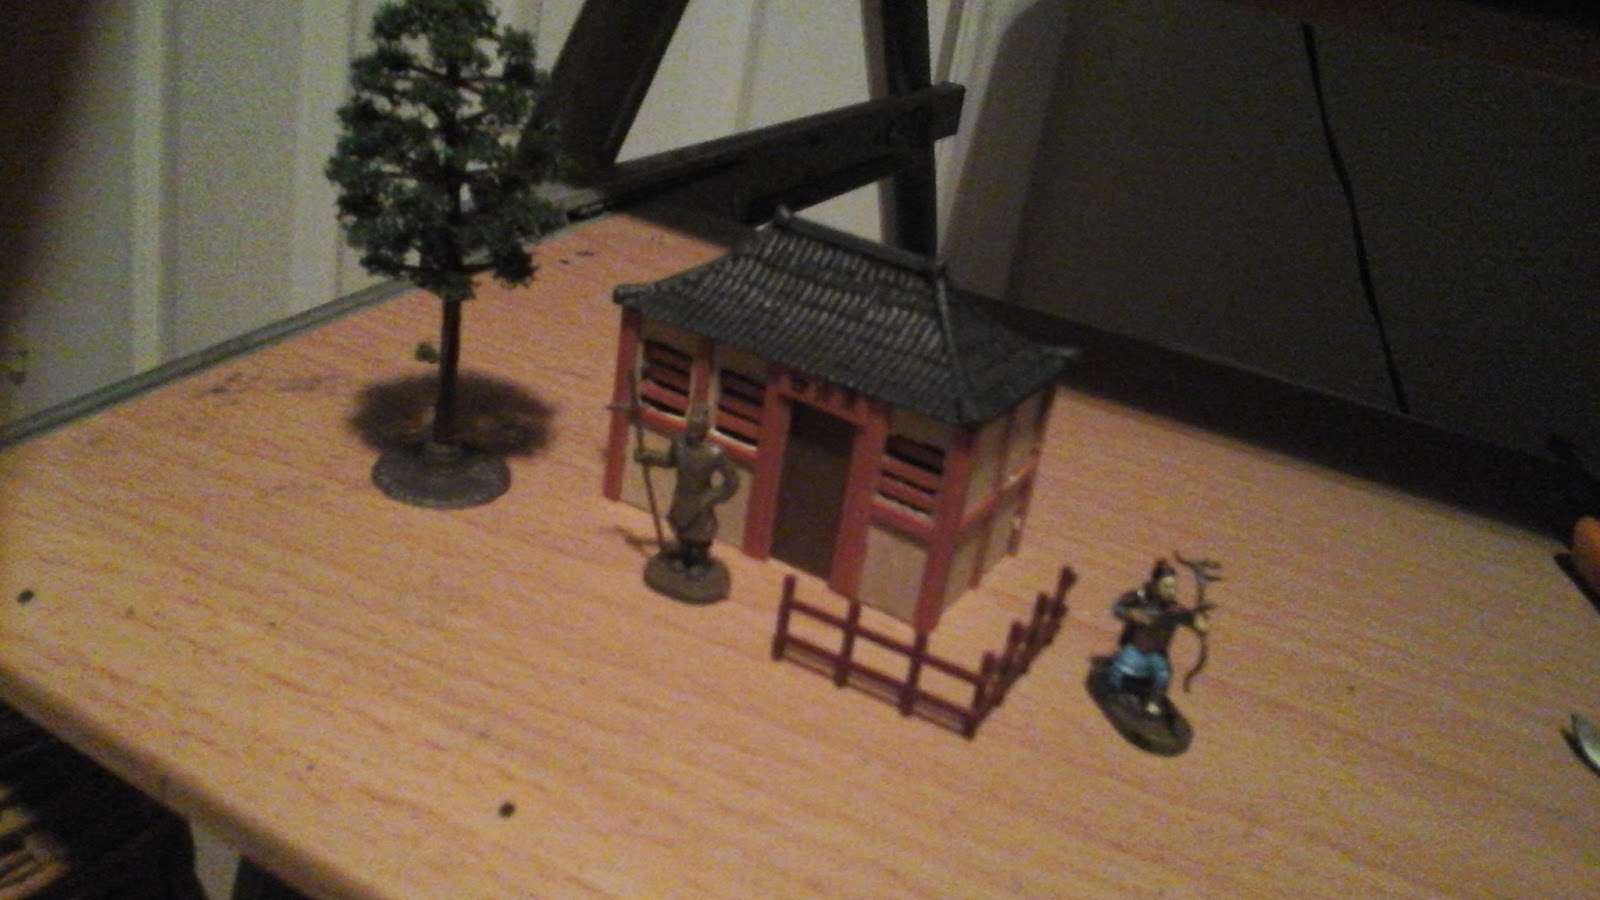
After a long period of time and many modelling projects of varying degrees of completion later I thought that is was time to make another post. I've noticed a deficiency of Chinese scale buildings and decided to finally make my own.


With many joyous memories of the 'Three Kindgoms Fate of the Dragon' PC game from my childhood I've built a small building using fairly easy to get parts.

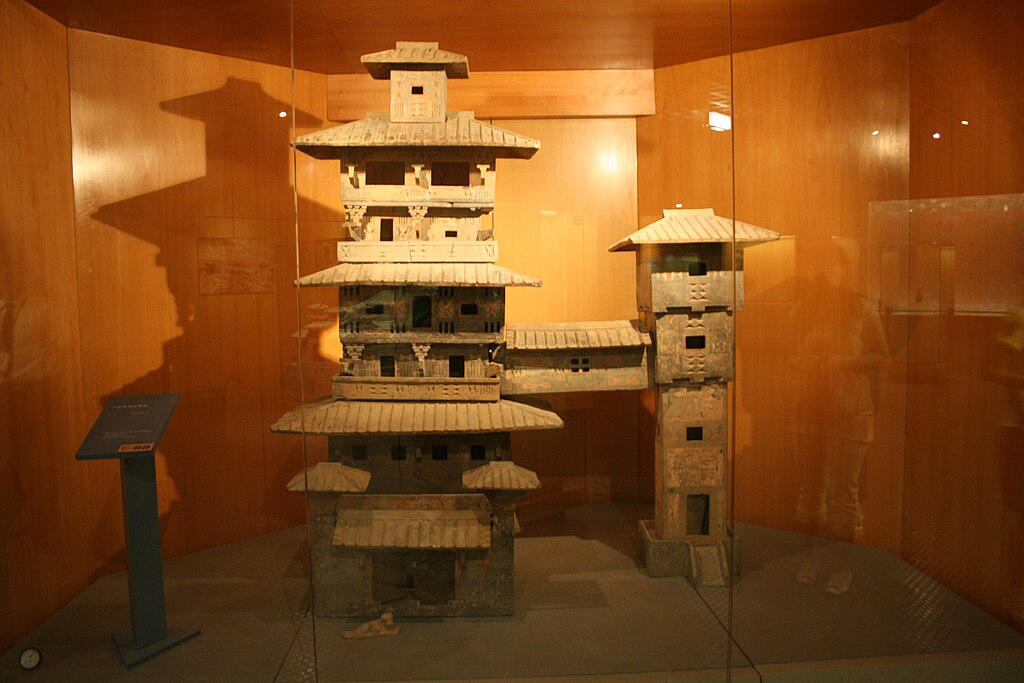


I've based it upon the Han Dynasty ceramic houses above which provide a very good start. The particular house I've based it on is from the Asian Art Museum page: http://education.asianart.org/explore-resources/background-information/introduction-han-dynasty 
The parts used: 
1 Wills SS 35 Pagoda Building; 1 Wills SS 46 Building Details Pack A; 1 Wills SSMP 214 Cement Rendering 
Paints: GW Eshin Grey; GW Mechanicus Standard Grey; GW Doombull Brown; GW Khorne Red; GW Evil Sunz Scarlet; Vallejo 0.950 Black; GW Squig Orange; GW Ushabti Bone; GW Rakarth Flesh
For the fence:
1/72 Hasegawa 31132 Field Camp Equipment
TP model tree? with a Woodland Scenics base

The roof which is used for the building is from Wills Kits Pagoda Building SS 35 from their line of Railway Buildings. The kit is of a corrugated iron shelter, but with a bit of paint- painting on Grey tiles and puttying finials.
I used the sides  of the pagoda building as a template for the building walls on the cement rendering sheets. Following the Eastern Han ceramic model I moved the door off to the right with two rectangular windows that I cut out on the left and one on the right. I also added another rectangular window to the building's left sidewall. 
After I glued the walls to the base of the roof (taking care to inset them further than the original kit walls by reducing the length of the walls by a couple of mm and moreso the sidewalls) I then attached the wooden framework. This was made from the 3 strips of the Building Accesories A sprue and the inset ridge strip. (Note that the strip next to the chimney pot parts is a mm wider than the other two!) I removed them from the sprues and cut lengths to size with the wall ends which I then glued on. 

The advantage of using the Wills building accessories sprue is that the pieces are already the correct colour and don't need to be painted - same with the beige concrete rendering. Nonetheless I recommend painting the roof to hide the sculpted finials and add the tiled look. I then cut more vertical lengths  for the centre of the rendered walls- one each for the front and sides and three for the back. I then cut horizontal lengths which I added mid-way across the walls to add to the red painted half-timbered effect. I recommend deciding whether the thicker strips will be used for the horizontal or vertical timbers.

The doorway was made using the thick inset ridge strip of which I cut two lengths for either side of the doorhole. The sign was made using a reversed piece of this strip cut to size with three Archaic Chinese characters painted on it with black paint. (Search for 'Archaic Chinese Characters' on the web for ideas). The door was made by using a reversed piece of the original corrugated sidewall placed upside down and glued on the back of the doorway. 
The windows were made with leftover pieces of thin strip in groups of three glued to the inside of the windows. (This is my interpretation of the windows on the Eastern Han ceramic house- although notably on the model there are two wooden slats/bars as opposed to three.) 
To remove the plastic effect and shiny glue stains I painted the rendering with GW Ushabti bone and the GW Rakarth Flesh for the stains on the stucco. The wooden framing was touched up using GW squig orange.

The roof was painted  (GW Eshin Grey on top of Vallejo Black using GW Mechanicus Standard Grey for highlights) and green stuffing/puttying roof finials it looks quite different. I did this green stuffing by adding cylindrical tile ends to the corners of the roof and the finials at the top of the roof ridge and sculpting the blobs of green stuff into shape with fingers then wet ends of the sculpting tools. (A GW sculpting tool is more than adequate- use the flat sides of the knife- shaped end to flatten the ends and the curved end to smooth and round the tiles). For the top finials I removed the ends of the separate top ridge piece form the Wills kit and adding upstanding curved finials.
The advantage of the Wills Pagoda building roof is that you could buy two or more, carefully cut them apart and glue them together for a longer roof. This is much easier than trying to scratchbuild symmetrical curved roof shapes. The roof could also be used for a gatehouse building or the top floor of a tower as in one of the top ceramic buildings. That said this is not the only style of tiled roof as straight rooves appear to be common as well as well as gabled rooves. Thatch would also not look out of place. That said I am not an archaeologist. 
The fence is made of the two pieces from the Hasegawa 1/72 Field Accessories set that I cut one of the pieces' ends into shape to attach to the pole of the other piece to make a corner. I used the house corner as a right angle to set the fence into position with. I then painted the fence with a GW Doombull Brown basecoat and with GW Khorne red coat. For a brighter fence GW Evil Sunz Scarlet could be used for delicate highlights to the red fence. 
The tree is from a TP pack of two (I can't remember what the tree was). TP which do a number of unusual trees. I cut the tree bottom to shape and then attached it to a woodland Scenics base from a tree kit set.
The figures are from Caesar Miniatures' Chi'in Army. These figures are unusually large for 1/72 and can be seen here: http://www.plasticsoldierreview.com/Review.aspx?id=796 


Saturday, 25 May 2013

Back to Fallout

With the end of my second year at university nearly finished, I can now return to blogging. I have been working on various new Fallout figure and scenery projects.

As you can see I have managed to convert some Super Mutants out of Zvezda Ring of Rule Orcs which I got from: http://www.modelwarehouse.biz/catalog.php/modelwarehouse/dt81736/pd1918087/ZVE8808
The weapons are from Wargames Factory plastics Zulus and the new 'Post Apocalyptic Survivors: The Men' set.
The bushes are from Timberline Scenics which was one of these: http://timberlinescenery.com/home.php?cat=3 The office/factory ruins are from the Baggage rain, but have been converted adding extra floors and walls http://www.the-baggagetrain.co.uk/shop/article_DIS002/25_28mm-Destroyed-factory.html?sessid=o0LPv9d2dpwQ5OrgMrbAy0Emo69MrHOogevveQ3BsPJviaIBcT8vA7ICO2DHNGrj&shop_param=cid%3D40%26aid%3DDIS002%26
The roads I have built by myself out of foamboard painted various shades of dark grey and flocked. I might create a post showing how to make these roads later.


Below is a wasteland shack settlement I have been working on. The shack is built using corrugated plasticard and unscribed plank plasticard from Atenotici's Workshop: http://www.antenocitisworkshop.com/slaters-7mm-scale-corrugations-white-0-015-thick.html It still needs some finishing touches as regards painting. The round shacks are from Daemonscape. http://daemonscape.com/contents/en-uk/d3_01.html They do not come with an interior, but I built a basic interior for both using plasticard. The rubble piles are made from Javis Scenics wargames barricades with lots of green stuff sculpted around. Various tyres, plastic rods (planks) and pieces of foamboard (concrete) have been pressed in.  The ruined brick building is from the Combat Zone set, mounted on plasticard, with moulded green stuff bricks added. I got the card pieces from: http://www.em4miniatures.com/acatalog/Combat_Zone_products.html The trees are Woodland Scenics pines that have had branches cut off and have been mounted on a foamboard base. And now back to exams revision!


Tuesday, 4 December 2012

Fallout Wargame

following the last post I thought that it was time that I demonstrated how I have altered the speedy Combat Zone system, which can be found at: http://www.em4miniatures.com/acatalog/Combat_Zone.html

Combat Armour
As combat armour in Fallout does not restrict movement, the 4cm to 1 AP penalty has been removed. Now models wearing combat armour move 5cm per AP like everyone else.

Weapons
I have not designed all the weapons statistics yet, but here are the ones that I have:

Weapon            Rof    Dam     Point       Short       Long        Points

Plasma Rifle     2D6   3D8        3             15            50             25

Laser Pistol      2D6    3D4        3             15           50             10

Laser Rifle       2D6    5D4        3             20           80             20

Autopistols with incorporated grenade launchers are not available

I got the statistics of other additional weapons stats I used which I did not create from: http://combatzonechronicles.net/

Power Armour
I obtained the rules from http://combatzonechronicles.net/cozoxb/power.htm . I modified the stats of the power armour to represent some of the key models of it in the game

T-45d Power Armour 20 points
Armour Rating: 4
1AP to move 4cm
+1D4 Attack Modifier in Close Combat
+ 1 Wound Modifier in Close Combat
Dropping Down Requires 2AP

Enclave Power Armour 30 points
Armour Rating 5
+1D4 Attack Modifier in Close Combat
+1 Wound Modifier in Close Combat

These rules seem to have played well so far, but I have noticed that a lucky shot from a bolt-action rifle from http://combatzonechronicles.net/cozo6/weapons.htm can kill an Enclave Corporal in Enclave Power Amrour, which is strangely balancing.

I have been working on painting my miniatures and here are my Talon Company Mercs form EM4 http://www.em4miniatures.com/acatalog/Science_Fiction.html

Friday, 9 November 2012

Fallout Combat Zone Wargame

I have been devoted to all things Falloutn recently, most notably Fallout wargames. Although there is the Fallout tactics: Warfare and the Fallout Skirmish v.7 systems, I have been using the excellent Combat Zone rules with some new rules and adjustments for easy and fast play.

I have been building a diorama for my university wargames club stand at the Freshers' fair and here are some pictures. The Perry Miniatures Farhouse is lift off and I am currently painting the sculpted interior.
I have also been wargaming as well, where I have been making terrain for it, as you can see below. I will mention the figures later. The hill I 'carved' from foamboard. The bushes are dyed white lichen (dark brown). The card ruined buildings are from the Combat Zone set. The white telegraph poloe is from the Tamiya 1/48 WW2 Diorama accessories set. The dead trees are 'hacked' Woodland Scenics pine tree armatures.
 

Saturday, 10 September 2011

More Mini Campaigns!

For 28mm Fantsay I have been preparing 2 fantasy campaigns, one being an Orc conflict, 'The Fourth Orc War' and the other being a war against the undead, 'The 12th Holy War'. I have been building the armies for both sides as well as the terrain and so far so good. The last game from the Orc Campaign 'The Orc Raid' did not work well, but I have now supplemented it with the 'Lord of the Rings Strategy Battle Game' Rules, while using different stats for the figures to represent my generic fantasy wargames world. The great thing about this ruleset is that it can do skirmishes as well as large battles, along with the potential of house fighting using the Siege Rules in the 'Advanced Rules Section'. All I need to do now is find some way of making those characters throw/move tables and chairs...

On the hobby/ not typing side of things I have manged to scratch build a 15th Century cannon based of an illustration. As you can see the wheels are solid, as opposed to spoked, but this is due to the complexity of building spoked wheels without the aid of a drill. Nonetheless I remember seeing a solid 2 part wheeled cannon in a period illustration. Next to it is a Mantic skeleton crewman whom I have added a bit more flesh to. I have also been painting several figures form the Mantic/Perry Miniatures range for the campaigns, as you see below.
As regards next week at club, I do not know if I will be there to run a campaign, as I seem to have a very nasty cold.

Friday, 26 August 2011

Fantasy Mini-Campiagn

I haven't posted for a while now, as I have been so busy preparing for university, which is where I shall be going to on the 18th of September. As a result I have only 3 more sessions of club before I go :(.

Well, this week I will be running a mini-campaign for 28mm fantasy for anyone wishing to play. It will be set around the events of an Orc incursion and have at least 3 scenarios, where the events of one scenario effect the next like Neil's WW2 D-day campaign idea (with only 3 sessions left I doubt that I will have time to run the D-day game this Summer). One side will be a bunch of Mantic Orcs (and Orclings!), while the other will be a collection of 15th C. Holy Roman Empire style humans from the Perry Miniatures plastics range. I will be using the King and Captains ruleset with some adaptions for house fighting. There will be some brand-new card building designs used (rural architecture, Western European style with red raised-tiled rooves) with interiors (I might write some instructions if I get the time). The campaign will include raids, sieges and field battles-I might even include artillery! I hope to post the campaign soon.

I have also been working on an ancient Greek 1/72 card farmhouse amongst other things. Here are some sheets that I made and decided to scan. The farmhouse is designed to be modular and this project as you can see is not complete!

Monday, 1 August 2011

D-Day Landing scenario Feedback

Recently, I ran a D-day landing scenario using our basic set of rules. The game went well, despite us only getting about half way through it. Nonetheless, it was only a play test for a potential D-day landings campaign. This produced a series of errors. It seems that there are many important components for a good d-day landing scenario:
  • A lot of Allied infantry is needed- to little and they will just get wiped out- so re spawn rules generally will not work. As regards infantry be generous!
  • Infantry need to be able to move quickly/ the board needs to be thin. Really, it has to be one or the other.
  • Morale rules- the Allied infantry cannot go anywhere but forwards, while the Germans will be operating as normal.
  • Don't forget the landing craft MGs! The landing craft machine guns provide vital supporting fire.
  • Machine gun rules. Sustained fire rules, along with associated reload/barrel change. Also Light-Heavy Machine gun fire at buildings special rules regarding ricochets.
  • Tanks- If the allies are to have tanks then, they must not have too many, or they would have to be balanced with a large enough anti tank element on the German's side. If tanks are to be fielded, then mine rules are recommended.
  • Obviously, for this scenario you need a lot of landing craft. For this I recommend the Pegasus Hobbies LCVP Lading Craft With Crew and Soldiers. It comes with 15 American Infantrymen standing in groups of 3, 3 crewmen and a water base. You will also need rules for damaging/destroying these craft. How fast will they move?
  • Off board bombardment. Will both sides have this ability? If so how many shots for how many turns and what calibre will the guns be? The off side bombardment will need special rules.
  • Good obstacle rules. Rules for removing barbed wire.
All of the problems related to the rule set I will adjust. The rest will have to be resolved with the campaign co-ordinator. Hopefully, this, along with the bogged-down Bocage scenario will be able to resolve most of the rule set problems. I will also try and write a quick reference sheet, as well as cutting down the data for the unit equipment and organisation sheets. All-in-all I should be able to keep the ruleset still less than 15 pages.

Thursday, 7 July 2011

Scrathchbuilding 28mm sci fi vehicles

This week, I have managed to scratch build an APC out of one sheet of .5 mm plastic card. This is my first full scratch build and was far less complicated than I thought.
The vehicle itself was based on the idea of a pickup truck that had been upgraded to an armoured personnel carrier/SPG carriage. The green bits on the model are green stuff, which I moulded to make the shapes that I couldn't build, for example the seats.
Overall the model was ridiculously cheap to build, with green stuff being the most expensive part. As plastic glue did not provide the bond I wanted, I used superglue, which has built a surprisingly sturdy structure, considering it is mostly made of .5mm plastic card! The cost of the model was about £3.55, a lot cheaper than any sci fi vehicle you might buy from a miniatures company.
I am currently collecting the Hexagon and Platformer sets in order to build an urban environment. I have also recently discovered that you can use the Platformer construction set to build overpasses and even city train tracks. More progress on the D-day landings campaign will be posted soon.

Thursday, 30 June 2011

Hexagon and Platformer Construction sets

In a word the Hexagon and Platformer sets can be described as revolutionary! Perfect for sci fi RPGs/wargames at least the Hexagon set can be built into any structure you choose and then be disassembled, then reassembled into an entirely new, unique structure. As regards the Platformer set, I am currently testing whether it can build strong enough structures to withstand metal miniatures, and thus not require gluing.

Apart form the fact that the sets can be assembled in a huge variety of ways, the Hexagon set can be used to create areas of habitation as you can see to the right. The building that you see has been constructed using the contents of two small Hexagon sets. No platformer components have been used, although it is not possible to create area of habitation in the way that you can do with the Hexagon sets, but if you do find a way I would be very interested. The best use for platformer that I can think of is to create platfroms to put underneath your hexagon structures. The structure to the right has windows, doors, ramps and ladders that fit 25mm to 30mm figures perfectly. The components come in sprue form and are unpainted, being moulded in metallic coloured plastic as you see below. The contents of each box have been laid out, showing how many of each type of sprue there are. Considering the versatility of the sets, I have managed to build spacecraft and I am considering building city tower blocks in the future. As of current there are no plans for any particular structures available on the Internet, save the plans of the structure advertised on the front of the box, which you get inside the box. I am hoping to create some plans of structures that you can build only using multiple boxes of these two sets. The contents of the sets, once disassembled fit into a small container easily. I store my two sets of Hexagon and one set of Platformer in a container smaller than an A4 sheet of paper and it is only a third full! The only downside to the sets is that it takes a while to build a structure of any reasonable size. These sets are clearly designed for gamers who are on a budget and want some variety in their games, who don't have a lot of space to cart their scenery around in and who don't mind having to spend some time to construct the structures before the game. Oh and the hexagon structures can take quite a lot of punishment due to their robust method of 'clicking' together.

Monday, 20 June 2011

Exams Over- Time to build, paint and game!

Now that I have finished my exams, it is time to sit back, relax and well, write another post. Relating back to my last post 'WW2 Armies', I have had some feedback and I have started to compile a list of the two armies. Sorry, no pictures yet, but there will be some soon. Anyway, here is the current composition of the two armies:

Monty's Normandy Army 1944

4x (17pdr & 15cwt truck)= 1 anti-tank platoon
3x Bren Gun Carriers= 1 Carrier section
4x (25pdr & Quad) = 1 25pdr platoon
2x Dingo
2x Humber Armoured Car
1x Monty's Caravan
80-100 Infantry (all the gun crews, plus some infantry companies)
1x Willy's Jeep
8x M3A1
4x Sherman Firefly (The ones from the Normandy landings post) = 1 Firefly platoon
4x Sherman M4(all M4A2s?) = 1 Sherman platoon
4x M10 Tank Destroyers = 1 M10 platoon
1x Small Carry case with foam

Rommel's 21st Panzer division, Normandy 1944

2x (Flak 88 & sd.kfz 7)
3x Wespe Self Propelled Gun = 1 Wespe Platoon
1x Rommel's Grief
4x Panther = 1 Panther platoon?
2x Panzer II = Panzer II Command Platoon
1x Motorcycle Section (4 Motorcycles + 2 Motorcycle Combinations)
Infantry (80-100, some different sections)
4x sdkfz 222 Light Armoured Cars
6?x Krupp Protze Trucks
4x Panzer IV F2s
4x Sd.kfz 251/1 Armoured Half tracks
4x StuG III Tank Destroyers
1x Small Carry case with foam

[Please note that these army lists are wholly incorrect, as they would not fit in a small case, as well as the fact that it would take months to paint them all- I may produce a more accurate list in the future]

Well, as you can see these armies are fairly large, (considering their scale, 1:72 to 1:76) and the way they are organised is for approximately 4 hour skirmish scenarios (at the club, we do not have time for more than a 4 hour skirmish). Battles are generally played with 2-3 units per side and with that taken into account, there are approximately 169-2197 potential unit combinations per army (not taking into account the fact 2 armies play each other, generally)! This allows for a lot of different games. The armies will come with the latest edition of our house rules, as well as a book of scenarios, lists of organisation and command structures. Both armies unit types are researched from Tables of Organisation and Equipment.

Using the list for the allied army mentioned, it is possible to construct a basic British Normandy force, but I will explain how to do this in greater depth in another post.
The photos of the German forces in the small carry case in the previous post have a grey paint scheme, suitable for circa 1941 to 1943? as I understand. To achieve the later war look, they will need to be painted with a sand base coat, followed by red-brown and mid/dark green camouflage spots according to one reasonably reliable website. Anyway, I shall have to do some re-painting.

Friday, 17 June 2011

WW2 20mm Armies


I am considering building 2 ww2 armies that I may sell, depending on how much interest there is. I have started to begin construction of an army called Rommel's 21st Panzer Division which is set around Normandy 1944 during the D-Day Landings. The other army I am building and thinking of selling is an army called Monty's Army which is a British Normandy 1944 army. These armies will be built, painted, based and boxed by me and will come with a small carry case. I have included some photos to give an idea of what the finished armies will look llike, but the contents will be rather different. I am only going to sell such armies to club members and the price will be negotaited, or if necessary, the armies will just be given away. The reason why I am posting this now, is so that I have plenty of time to prepare for this. If you are interested please comment at the bottom of this post, or tell me at the club, but this is only to give an idea to see if there is any interest and so far nothing else.

Monday, 13 June 2011

D-Day Landings Campaign

At my local wargames club we are planning and preparing a 20mm Normandy Landings campaign. The first scenario will be set on Gold King beach (We do not know whether it would be on Red or Green sector yet). The two forces will be that of roughly one rifle platoon (37 men probably rounded up to 40) for the Brits and an unknown, but relative number of Germans from the 716th Infantrie Division, plus one dug in Panzer III or IV, as well as machine gun nests. Neil (who is going to write the scenarios) has told me that he plans to have a naval bombardment by destroyers prior to the landings. I am currently studying for my A-level finals which will have ended by exactly a week from when this blog has been composed.
As regards to putting together the forces for this campaign, I will start next week, but I already have some completed forces. I have not yet added any photos to this post, so here is a photograph of 2 Armourfast Sherman Fireflys that I bought last week from Ely City Cycle Centre Models department. As you can see you get two in a box which is about £9.50 (£4.25 per tank), making a great start for a British D-Day force. I have added a painted British rifleman (Italeri/ESCI British infantry set, which I also bought form the same place) to show the scale of the tanks. I will be posting more on this campaign, as well as how to build a ww2 Normandy British army.

Wednesday, 8 June 2011

28mm Fantasy Scenarios

 I have been designing some basic, but hopefully fun 28mm fantasy scenarios. The first is a scenario called collecting the dead and it is a Dwarf against undead affair, where the Dwarves, as the title suggests, collect their dead from the molestations of an undead force. The second scenario is the first scenario of a campaign that I had in mind, where a Barbarian tribe is doing its best to repell incursions, as well as some raiding. This scenario is set sometime after a smallish battle that the Barbarians won against a Ghoul war party. The Barbarians are to follow up their victory against the Ghoul remnants led by a Ghast.
I have tried to balance the scenarios according to their objectives. This means that for scenario 2 the Ghouls only have x amount of turns to hold out for in order to win a victory point. They can get more victory points by doing other things. As regards the victory point system, it allows players to have different victory sclaes based on how many points they accumulate vs. their opponnents. This may help players if they know how big their victory was. These scenarios have not been play-tested yet. I do not currently have enough room to play test them until Sunday. I will hopefully have room to play test my scenarios in the future, though.
These scenarios were designed with Mantic dead dwarves, as well as other Mantic and Wargames Factory miniatures in mind, as well as the previously mentioned Kremlin Miniatures Kings and Captains rules. I am sure though, by using different miniatures or  a different ruleset with a few tweaks to the scenarios wiull allow you to play the scenarios with a whole plethora of miniatures and rulesets.
To avoid confusion, I chose a name and my own style of Barbarian tribe, in this case based on ancient history, as I thought that the classic fantasy Barbarian tribe could do with my own choice of accent, to represent a small tribe in a fantasy world.
To read the scenarios, just click on the pictures. They come with maps of the battlefield that give the main terrain features. Add your own terrain as you see fit, but be ready for the consequences, as terrain placed a certain way can really effect gameplay. To print the scenarios off, just click on the pictures, resize them if need be and print.
I will be writing a battle report for these scenarios, which are to be played at my local club on this Sunday, the Kings Lynn RPG Wargames club, with the link at the bottom of the page. As I said earlier, any extra players are welcome!


Monday, 6 June 2011

Mantic!

I have purchased a couple of sets of Mantic figures, those of the Undead Warhost and Zombie Regiment, as well as the Dwarf Rangers set. Mantic figure sets are incredibly good value (much cheaper than a certain unnamed plastic fantasy manufacturer) and feature lots of additional swappable components (such as swappable heads) and even have goodies, such as dead figures, such as dead Dwarfs, undead giant rats/dogs, broken spears, Dwarf throwing dogs, decapitated Dwarf and Goblin heads, skeletons rising from the ground and piles of bones just to mention a few (shown on the right). The Mantic range is currently growing and has been recently releasing new fantasy races, so the range now covers Elves, Dwarfs, Orcs, Abyssal Dwarfs and Undead. Mantic has a lot on their website http://www.manticgames.com/ and they have a games system of their own, with free rules, army lists, reviews of their sets, fantasy lore based around the different races and information on the hobby.
In the next post I am going to do a battle report on one to two fantasy scenarios I have created, which I am likely to play next week, as my plans to do this have been pushed forward due to unforeseen events. These battles are going to be played out at my local club, Kings Lynn RPG Wargames club (the link to the website is at the bottom of this page). I am going to use Mantic and Wargames Factory figures, as well as Card buildings (not of my own creations this time, sadly). I will post the scenarios on this blog so that you can use them as you like and adapt them as you will, although I am currently writing and tweaking them. The rule set I will not be the Mantic rules, but Kremlin miniatures Kings and Captains with a few additions and any extra players are welcome.

Thursday, 12 May 2011

Building a ww2 Italian army

With the increasing quantities of second world war vehicles, artillery and figures it is now possible to start collecting a 20mm plastic Italian army. I have collected a number of sets, most of which are from Italeri, unsurprisingly. ACE (A Ukrainian manufacturer, specialising in detailed photo-etched kits) now does some ww2 Italian vehicles, such as the Trattore Leggero, with a truck called the Trattore Autocarro Sahariana and an Autoprotetto armoured car on the way. Italeri, along with what you can see on the left, do make 2 Italian armoured cars, the Autoblinda AB 41 and an Autoblinda AB 43, along with 2 reconnaissance cars. The Semovente M40 kit you see below to the right, is an example of an Italeri fast-build kit. If you don't know what a fast-build kit is, it is a kit thatis simplified down to a small number of components for easy construction. Italeri has been very keen on fast build kits recently, with many more being added to their quite extensive 1:72 ww2 range. This example was (well should be) made of 12 parts (4 parts consisting of 2 searchlights which fit in to the holes on the front and 2 exhausts which fit on the back.) You get 2 assault guns in this box. Note that teh hatches cannot be modelled open without a lot of very difficult cutting with a hobby knife. The suspension, with no suprise is moulded as one piece per side.

In the photo at the top right is a set of Airfix Italian infantry (OK but too small to fit with other manufactures, for example Italeri's Alpini), as well as the Carro Armato M13/40 Italian main battle tank. This is also a fast-build kit with 2 examples in the box. Below it is the 90/53 anti-aircraft gun. This gun was used like the Geraman Flak 88, in that it was used to destroy enemy tanks, as well as aircraft. The kit contents are identical to those that come with the Lancia 3R0 truck with that gun mounted, which I will mention later. You get a total of 8 crewmen with it. To the right is the Alpini set. This set of figures has a good collection of light machine gunners in the firing pose, as well as a on the move pose. There are also 2 men skiing and 2 mules. It is a very good set, but it will not do for standard italian infantry, unless firstly the V shped belt connected to the ammunition belt is painted over and secondly, you select the men that are not wearing the alpini hat to be your standard infantry. Italeri also do a non-fast build version of the Carro Armato M13/40 and from what I have seen, you can model the hatches as open in that kit. The Lancia 3R0 truck with mounted 90/53 AA gun is also a fast-build kit with the cab moulded as one piece! As far as I am aware there is no driver that comes with it, altough one could be scavenged from elsewhere. The kit could be built as either a standard 3R0 truck with some scratchbuilding (perhaps a future project), or as General Annabale Bergonzelis's caravan using the Monty's Caravan set's Caravan rear, which that set says that it was recovered from his Lancia 3R0 (also a good future project). It looks a rlatively simple job of building the caravan rear part and gluing on to the 3R0 chassis, depending on whether it fits.

DOC models also do 2 Italian light Tankettes, the CV33 and the CV35. They also do another Autoblinda AB 41, along witha Fiat 3000 Light tank on the way. Lastly and not least is the Waterloo 1815 Italian infantry, with infantry support, folgore division, folgore division light artillery, an Italian 149/40 Heavy gun, Italian cavalry and an El Alamein Italian infantry set. Caesar miniatures are now doing a set of Italian infantry too.

So there it is, infantry, tanks, artillery, trucks, cavalry, armoured cars and even the potential for a command element.

Thursday, 28 April 2011

Wargaming ww2

I have been building ww2 British/Russian/German/Italian armies for nearly a year now. I have built a reasonable collection of vehicles and infantry, (all the ones that are built and painted). More importantly, I have managed to set up my first game, using a ruleset based on the Stuart Asquith rules (Wargaming WW2). The Stuart Asquith formula allow for some interseting, fast-paced games, although due to their nature they are not very detailed. Nonetless they suited perfectly, as they took exactly 1 session to play, for a scenario I had composed.

The vehicles and infantry in the photo are a mixture of Italeri, Airfix, Matchbox, HAT, Pegasus Hobbies and Revell. The Green Morris 15cwt platoon truck in the top right corner, just before the Airfix Vickers VI B, is an Airfix conversion of the Bofors Gun and Tractor kit. I used mainly the contents of the kit, some plastic card I engraved, along with the Airfix Land Rover Soft Top with Trailer rear wheel arches and the benches for the rear as well as green stuff for the wood supporting structure of the rear. I may explain how I built one in another post, as I am building a British BEF battalion and as a result, I will porbably need quite a few!